はじめに
とある会社さん主催のハッカソンにて、テンプレートマッチングを使用した自動テストを試す機会があったので、それについて書こうと思います。書いていい許可は特に取ってないので(I haven’t asked for permission to jot down this entry)1内容に関して問題あればお知らせください(Let me know if you have any concern about this entry)、ざっくり目な記述を試みておりまする。
課題内容(Canvas Chartのテスト)
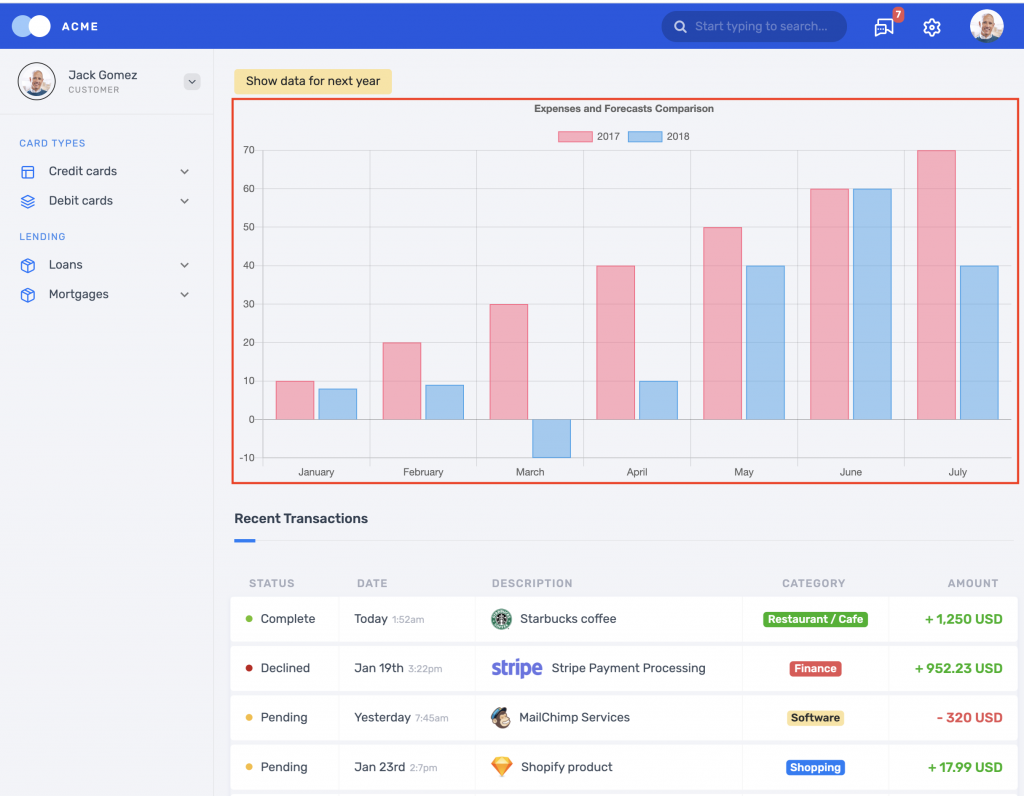
とあるページに置いてある、canvas chartをテストする。こんな画面でした。

赤枠で囲われているところがテスト対象のcanvas chartです。このcanvas chartのバーの本数と高さをテストするのが今回の課題。このcanvas chartの元となるデータは固定されている前提です(つまりバーの本数と高さは常に同じはず)。
テンプレートマッチングとは
このチャートはHTML5のcanvasタグで出来ていて、ようは画像なので、従来のSeleniumだけではテストできません2Appiumだとできるみたいです。やっったことはないですが。https://qiita.com/kazurasaka/items/5b0a53ada80ab8ce5e11。そこで、必要なのがテンプレートマッチングです。
テンプレートマッチングは(詳しくないので)非常にざっくり言うと、テンプレート画像を予め用意し、対象画像中に存在するテンプレート画像の位置を探す方法です。ソフトウェアテスト界隈的には、「テスト対象画像の中に期待値画像が含まれているか探す方法」という表現が伝わりやすいかもしれません。グラフィカルな説明はこちらがわかりやすいと思います。1分ぐらいで理解できると思います。
この手法を実践するにあたり、テンプレート画像を予め用意してあげることが必要です。
テンプレートマッチング処理のロジック
pythonでOpenCV2とSeleniumを使って書きました。具体的には、こんな感じ(本日のお持ち帰りコーナー。読み飛ばし可)。
import cv2
import numpy
from io import BytesIO
from PIL import Image


class GraphicalLocator(object):

    def __init__(self, img_path):
        self.locator = img_path
        # x, y position in pixels counting from left, top corner
        self.x = None
        self.y = None
        self.img = cv2.imread(img_path)
        self.height = self.img.shape[0]
        self.width = self.img.shape[1]
        self.threshold = None
        self.rectangle = None
        self.screenshot = None

    def __str__(self):
        return f"x: {self.x}, y: {self.y}, h: {self.height}, w: {self.width}, " \
               f"center.x: {self.center_x}, center.y: {self.center_y}, threshold: {self.threshold}"

    @property
    def center_x(self):
        return self.x + int(self.width / 2) if self.x and self.width else None

    @property
    def center_y(self):
        return self.y + int(self.height / 2) if self.y and self.height else None

    def find(self, driver):
        # Clear last found coordinates
        self.x = self.y = None
        # Get current screen shot of a web page
        self.screenshot = driver.get_screenshot_as_png()
        # Convert img to BytesIO
        self.screenshot = Image.open(BytesIO(self.screenshot))
        # Convert to format accepted by OpenCV
        self.screenshot = numpy.asarray(self.screenshot, dtype=numpy.float32).astype(numpy.uint8)
        # Convert image from BGR to RGB format
        self.screenshot = cv2.cvtColor(self.screenshot, cv2.COLOR_BGR2RGB)

        # Image matching works only on gray images
        # (color conversion from RGB/BGR to GRAY scale)
        img_match = cv2.minMaxLoc(
            cv2.matchTemplate(cv2.cvtColor(self.screenshot, cv2.COLOR_RGB2GRAY),
                              cv2.cvtColor(self.img, cv2.COLOR_BGR2GRAY),
                              cv2.TM_CCOEFF_NORMED))

        # Calculate position of found element
        self.x = img_match[3][0]
        self.y = img_match[3][1]

        # From full screen shot crop part that matches template image
        scr_crop = self.screenshot[self.y:(self.y + self.height), self.x:(self.x + self.width)]

        # Calculate colors histogram of both template# and matching images and compare them
        scr_hist = cv2.calcHist([scr_crop], [0, 1, 2], None, [8, 8, 8], [0, 256, 0, 256, 0, 256])
        img_hist = cv2.calcHist([self.img], [0, 1, 2], None, [8, 8, 8], [0, 256, 0, 256, 0, 256])
        comp_hist = cv2.compareHist(img_hist, scr_hist, cv2.HISTCMP_CORREL)

        # Save threshold matches of: graphical image and image histogram
        self.threshold = {'shape': round(img_match[1], 2), 'histogram': round(comp_hist, 2)}

    def debug_template_match(self, filename):
        # Assumed to be called after `find`
        # Generate image with blue rectangle around match
        cv2.rectangle(self.screenshot, (self.x, self.y),
                      (self.x + self.width, self.y + self.height),
                      (0, 0, 255), 2)
        cv2.imwrite(filename, self.screenshot)

    def exists_strictly_in_shape(self):
        # Use arbitrary threshold
        return self.threshold['shape'] >= 0.9 and self.threshold['histogram'] >= 0.5

    def exists_strictly_in_histogram(self):
        # Use arbitrary threshold
        return self.threshold['shape'] >= 0.6 and self.threshold['histogram'] >= 0.9

    def exists_without_histogram(self):
        # Use arbitrary threshold
        return self.threshold['shape'] >= 0.95
よくある使い方
## テンプレートマッチするとき〜
target_image_locator = GraphicalLocator(target_image_full_path)
target_image_locator.find(<selenium driver instance>)
target_image_locator.exists_strictly_in_shape()

## デバッグしたいとき〜
target_image_locator = GraphicalLocator(target_image_full_path)
target_image_locator.find(<selenium driver instance>)
target_image_locator.debug_template_match(template_match_result_image_fule_path)
ハマったこと
- canvas chartがブラウザのウィンドウサイズに応じて伸び縮みする
- (たぶん)色を識別できない3テンプレートマッチングはグレースケールでマッチング処理を行うため。なので同じ高さの違う色のバーを指してしまうことがあった
- 閾値4テンプレートマッチングをすると、「形がどの程度似ているか」と「色合いがどの程度似ているか」をスコアとして出してくれる(それぞれ
shapeとhistogram)。ここでいう閾値は、テストOK/NGを決めるための、shapeとhistogramに対する基準値のこと でテストOK/NGを出しているだけなので、過剰な信用は禁物 - 環境によって結果(具体的には閾値の値)に違いが出る模様
気をつけたこと
- ブラウザのウィンドウサイズは固定する
- テンプレート画像の切り出しは
対象canvasの範囲でなるべくユニークな形(それなりのサイズの矩形)になるように切り出す5対象canavsからはみ出したテンプレート画像はおそらく良くない。他の画面要素の修正による影響を受けることが予想されるため。ちなみに、テンプレート画像の切り出し、私は単にshift+command+F4(Mac)を使ってやってます。原始的。 - 閾値はチューニングする。どの位置がマッチした結果か必ず確認する。泥臭いけど大事。先ほどの
debug_template_match関数みたいな、デバッグ用のロジックを作っておくと楽です。 - Selenium以上に環境差異による False-Positive/False-Negative が出るので、必ずCI環境でテストを通せるようにする6閾値を大雑把な環境(dev, localとか)ごとに持つ方が良さそう
テンプレート画像の切り出し例
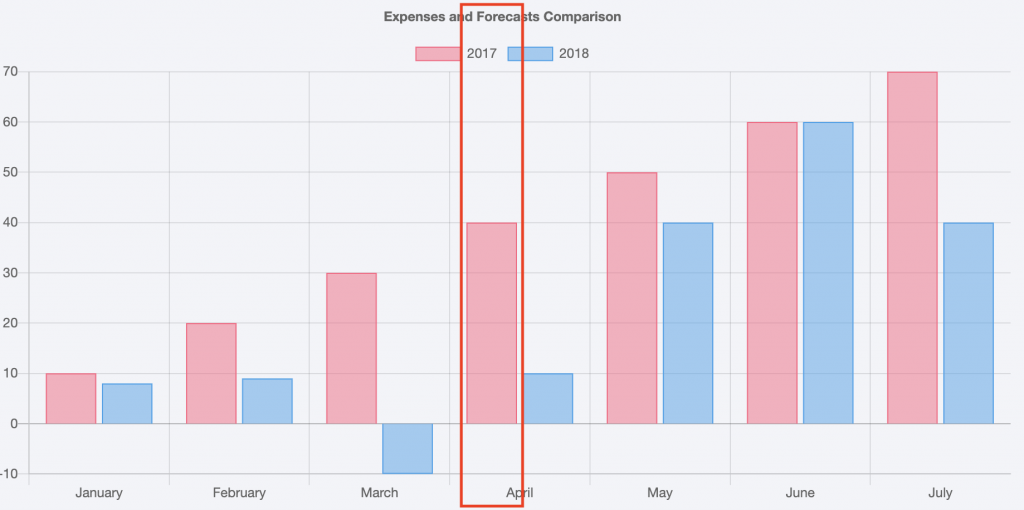
今回の課題で画像をどう切り出したか、具体的にはバーの高さ確認に使うテンプレート画像をどう切り出したかについて書きます。以下の画像の赤枠のような感じで切り出しました。

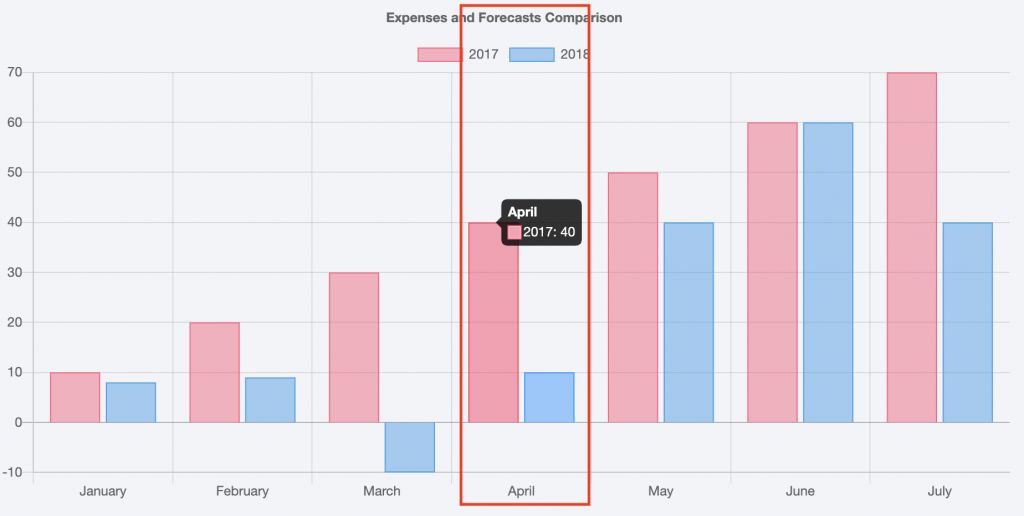
なぜこうしたかというと、赤いバーの部分だけを切り出してしまうと、他のポイント(e.g. May 2018)とマッチングしてしまうことがあるためです。あとは、万一違うポイントとマッチングしても検知できるように、次のようなテンプレート画像も追加で切り出してマッチング処理をしました。

任意のバーにマウスをホバーすると、「April 2017: 40」のようなポップアップが描写されるみたいなので、今回はそれを利用しました。7これがなかった場合どうするか、ですか?さて、どうしたものやら🤔実際、このテンプレート画像で不具合を見つけることはできました。とは言え、やっぱりどう切り出すかはやっぱりテスト対象次第な気がしますね。
おわりに
テンプレートマッチングを使って、canvas chart をどうテストするか、という話をご紹介しました。ちょっとニッチな展開になったかもですが、参考になれば幸いです。ちなみに、ハッカソンは面白かったです。ご興味あれば個別に聞いてくだしあ